Blake3: A JavaScript Optimization Case Study

Blake3 is a popular hashing algorithm that performs a few times faster than others like Sha256.
It achieves this by
- Using fewer rounds in its compression function (an approach inspired by Too Much Crypto) and
- Enabling high parallelization where each chunk of data can be processed in parallel before the merge, through The Merkle Tree-style splitting of the data and merging of the two nodes to form parents.
To learn more about how we leverage Blake3 at Fleek you can read our other blog. This article will focus on the technical details of how we made Blake3 run faster in browsers.
Here you can see a high-level video of how Blake3's parallelization works:

However, since Blake3 is not part of the subtle crypto API, native implementations of the algorithm are not provided in the browser. This leaves developers to have to use other implementations. However, currently, there is only a WASM implementation.
Yet the WASM implementation does not use SIMD which seems to be a wasted potential, so in this blog, we want to go explore the performance of a pure JavaScript implementation of the algorithm and then do some black magic to use SIMD.
The Problem With WASM
High shipping cost. This comes in two forms, first of all, wasm files are relatively large for what they do. The simple blake3 implementation produces a 17KB binary file that can not be compressed any further, while a JS file could be. Gzipping a wasm file does not have any effect for obvious reasons.
The second issue and this is more from a tooling aspect is that the maintenance cost of a JS library that uses WASM could be a bit harder than it should be. You have to consider different runtimes and how you want to get the wasm file. And personally as a developer, I rather not depend on a process that involves loading a WASM file.
JavaScript is simple, you can ship one file and it will just work, you don’t even have to care about much. And of course, these points I am making are coming from a point of preference.
However, eventually, in this blog we will use WebAssembly, but at no point do we intend to ship a .wasm file. So let’s go.
Setting Up The Benchmark
We can’t improve what we can’t measure and yet there are different JS runtimes around. To keep the data simpler to understand, we primarily focus on the JS performance on V8, maybe in the future we can go through the same process in some other engines and that could be an interesting article of its own.
The benchmark is simple, we generate some 1MB random data and use Deno.bench and compare the performance of the different hash functions we have on some standard data sizes. We are going to run these on an Apple M1 Max and compare the results.
To get started we can set a baseline by comparing an implementation of Sha256 and a WASM compilation of the hash function from the official Rust implementation.
import { hash as rustWasmHash } from "./blake3-wasm/pkg/blake3_wasm.js";
import { sha256 } from "https://denopkg.com/chiefbiiko/sha256@v1.0.0/mod.ts";

// Share the same input buffer across benchmars.
const INPUT_BUFFER = new Uint8Array(1024 * 1024);
const BENCH_CASES = (<[string, number][]>[
  ["96B", 96],
  ["512B", 512],
  ["1Kib", 1 * 1024],
  ["32Kib", 32 * 1024],
  ["64Kib", 64 * 1024],
  ["256Kib", 256 * 1024],
  ["1MB", 1024 * 1024],
]).map(([humanSize, length]) => {
  // Slice up to `length` many bytes from the shared array.
  const array = new Uint8Array(INPUT_BUFFER.buffer, 0, length);
  return <[string, Uint8Array]>[humanSize, array];
});

// Randomize the input.
for (let i = 0; i < INPUT_BUFFER.length; ) {
  let rng = Math.random() * Number.MAX_SAFE_INTEGER;
  for (let j = 0; j < 4; ++j) {
    INPUT_BUFFER[i++] = rng & 0xff;
    rng >>= 8;
  }
}

function bench(name: string, fn: (array: Uint8Array) => any) {
  for (const [group, input] of BENCH_CASES) {
    Deno.bench({
      name: `${name} ${group}`,
      group,
      fn() {
        fn(input);
      },
    });
  }
}

bench("Sha256", sha256);
bench("Rust (wasm)", rustWasmHash);
📌 You can also see this initial state of the repo at this point of the journey on this link, as we make progress in the blog there will be new commits on that repo. So in case you wanna jump ahead and just look at the outcome, you can just go to the
mainbranch on that repo and check it out!
Our First Pure JS Implementation
For the first implementation, we can skip over any creativity, our goal is to be more concerned with the correctness of the algorithm so we mainly base the initial implementation on the reference_impl.rs file from the official Blake3 repository. The only adjustment is that we only care about implementing a hash function and not an incremental hasher.
You can see the first implementation on Github, here we focus on some small explanation of the code.
As our main entry point, we have the hash function defined as:
export function hash(input: Uint8Array): Uint8Array {...}In this function, we mainly split the input into full chunks (that is 1024 bytes), and we ran the compression function on each 16 blocks that make up the chunk. (So each block is 64 bytes)
At the end of compressing each chunk of data we push it to the chaining value stack and after that depending on where we are in the input we merge a few items on the stack to form the parents. This is done by counting the number of 0s at the end of the chunk counter (number of trailing zeros) when written in binary. And in case you’re wondering why that would work, I want you to notice how that number is the same as the number of parents you can walk up the tree while still being the right child repeatedly.

The rest of the code is mostly the implementation of the compress function that has one job:
- Take the one block of input (64 bytes or 16 words) and 8 words called cv, and compress it down to 8 new words. We call these 8 words also the chaining value.
- To hash each chunk of data (1024 bytes, 16 blocks) we repeatedly call the compress function with each block and the previous
cvwe have. However for the first block in each chunk since we don’t have a previous chaining value, we default the first one toIVwhich stands for Initialization Vector.
🤓 Fun Fact: Blake3 uses the same IV values as SHA-256. The first 32 bits of the fractional parts of the square roots of the first 8 primes 2..19. It also uses the
roundfunction from the ChaCha. Which itself is based on Salsa.
Setting Up The Test Ground
To make sure we’re doing things correctly, we use a rather large test vector that is generated using the Rust official implementation and test our JS implementation against it. This way on each iteration and change we make we can make sure we’re still correct before getting hyped about performance. A no-op hash function is always the fastest hash function, but we don’t want that, do we? You can check out the tests in test.ts
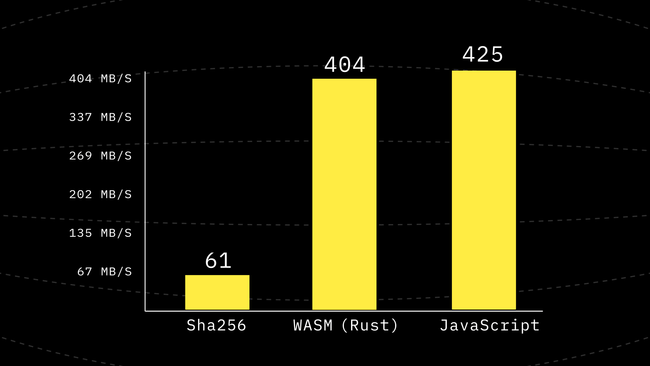
First Look At The JavaScript Performance
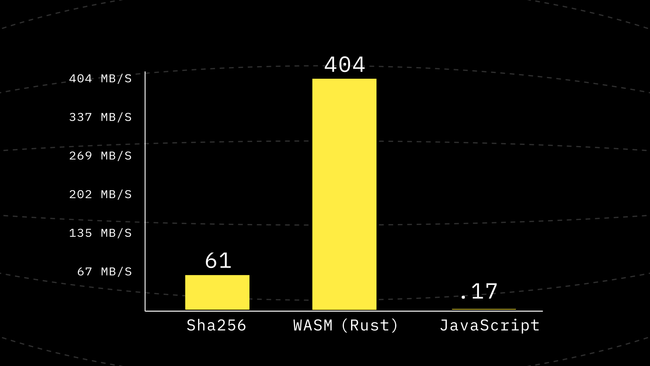
Hmm… So at this point, our first JavaScript port is about ~2000x slower than WebAssembly. Yet looking at the code it is expected, after all the first iteration is about keeping it as close as possible to an academic reference implementation. And that comes with a cost.
Step 1: Using a Profiler
See this commit on GitHub: add readLittleEndianWordsFull
Although the initial code is really bad, it is not surprising and we can clearly see way to many improvements we could make. But to set a better baseline it’s better if our first improvement is something that can benefit us the greatest with the least amount of change to the code.
We can always use a profiler to do this, V8 is shipped with a really nice built-in profiler that is accessible through both Deno and Node.js. However, at the point of writing this blog, only node comes with the pre-processing tool that takes a V8 log and turns it into a more consumable JSON format.
In theory, you could use Deno to generate the v8 log and Node.js to parse the log, but doing that I did run into some issues related to V8 version mismatch between the runtimes. So I chose the easy path of just using Node.js to run both the profiler and the pre-processor.
First, we need a simple JS file that could use the hash function we want to profile, it doesn’t have to be anything crazy.
// prof.ts
import { hash } from "../js/v0.ts";

const INPUT_BUFFER = new Uint8Array(256 * 1024);
for (let i = 0; i < INPUT_BUFFER.length; ) {
  let rng = Math.random() * Number.MAX_SAFE_INTEGER;
  for (let j = 0; j < 4; ++j) {
    INPUT_BUFFER[i++] = rng & 0xff;
    rng >>= 8;
  }
}

for (let i = 0; i < 20; ++i) {
  hash(INPUT_BUFFER);
}
We can run the following commands to get the profiling result. First, we bundle and transpile the typescript to JavaScript so Node.js could run it. deno bundle however deprecated is still the simplest tool to do the job.
deno bundle prof.ts > prof.js
node --prof --prof-sampling-interval=10 prof.js
node --prof-process --preprocess *-v8.log > prof.json
Looking at the result of the profiler we can see that readLittleEndianWords is one of the hottest functions in the code. So let’s improve that as our first step.
Looking at the source of readLittleEndianWords we can see that there are a few conditionals that could have been left out if we knew that we are reading a full block of data. And interestingly enough at every part of the code, we always know that we are reading a full block except for the very last block of data. So let’s go ahead and implement a new variant of the function that leverages that assumption.
function readLittleEndianWordsFull(
array: ArrayLike<number>,
offset: number,
words: Uint32Array,
) {
for (let i = 0; i < words.length; ++i, offset += 4) {
words[i] =
array[offset] |
(array[offset + 1] << 8) |
(array[offset + 2] << 16) |
(array[offset + 3] << 24);
}
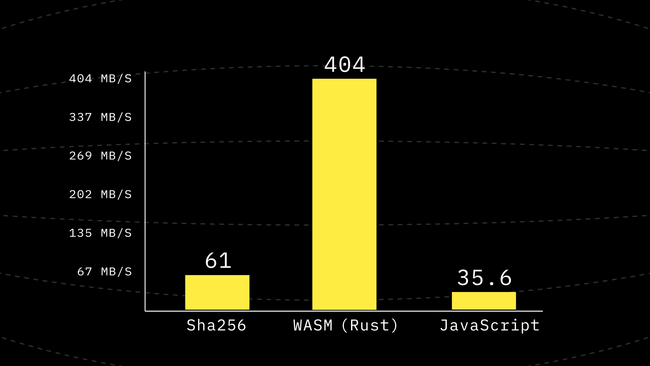
}This function is a lot more straightforward and should be relatively easier for a good compiler to optimize. So let’s go ahead and benchmark again.

For how small of a change we made, this is definitely a great win. But we are still far away from the WebAssembly performance.
Step 2: Precomputing permute
See this commit on GitHub: Inline Permutations
For this step, I want to take your attention to these particular lines of the code. Some parts are stripped out and replaced with ... for the sake of focusing on the right place.
const MSG_PERMUTATION = [2, 6, 3, 10, 7, 0, 4, 13, 1, 11, 12, 5, 9, 14, 15, 8];
...
function round(state: W16, m: W16) {
  // Mix the columns.
  g(state, 0, 4, 8, 12, m[0], m[1]);
  g(state, 1, 5, 9, 13, m[2], m[3]);
  ...
}

function permute(m: W16) {
  const copy = new Uint32Array(m);
  for (let i = 0; i < 16; ++i) {
    m[i] = copy[MSG_PERMUTATION[i]];
  }
}

function compress(...): W16 {
  ...
  const block = new Uint32Array(block_words) as W16;
  round(state, block); // round 1
  permute(block);
  round(state, block); // round 2
  permute(block);
  round(state, block); // round 3
  permute(block);
  round(state, block); // round 4
  permute(block);
  round(state, block); // round 5
  permute(block);
  round(state, block); // round 6
  permute(block);
  round(state, block); // round 7
  permute(block);
  ...
}
Looking at the code above we can see some annoying things, on the top of the list is the two new Uint32Array calls we have which are unnecessary allocations and moves of bytes that could be avoided. The other thing that we can notice is that all 6 permute calls are deterministic and this opens the possibility of pre-computing a look-up table.
So let’s go ahead and do that. First, we have to see what the point of calling permute is. It is called to rotate the block by swapping the words via some permutation table right before performing a round. And the only place that reads this new permuted version of the data is the round function. Which always tries to read the words in the same order.
In order we inline permute we could change round so we could tell it about an access order it should use rather than actually moving the bytes.
function round(state: W16, m: W16, p: number[]) {
  // Mix the columns.
  g(state, 0, 4, 8, 12, m[p[0]], m[p[1]]);
  g(state, 1, 5, 9, 13, m[p[2]], m[p[3]]);
  ...
}

...
round(state, block, [???]); // round 1
...
With this change we now have a shot at removing permute entirely, however, generating the access order by hand is difficult and we already know how to write code. So let’s write this part by writing a code that could write it for us.
const MSG_PERMUTATION = [2, 6, 3, 10, 7, 0, 4, 13, 1, 11, 12, 5, 9, 14, 15, 8];
// 0, ..., 15
let numbers = MSG_PERMUTATION.map((_, idx) => idx);
for (let i = 0; i < 7; ++i) {
  console.log(`round(state, m, [${numbers.join(",")}]);`);
  numbers = MSG_PERMUTATION.map((p) => numbers[p]);
}
Running the code above produces the following outcome:
round(state, m, [0, 1, 2, 3, 4, 5, 6, 7, 8, 9, 10, 11, 12, 13, 14, 15]);
round(state, m, [2, 6, 3, 10, 7, 0, 4, 13, 1, 11, 12, 5, 9, 14, 15, 8]);
round(state, m, [3, 4, 10, 12, 13, 2, 7, 14, 6, 5, 9, 0, 11, 15, 8, 1]);
round(state, m, [10, 7, 12, 9, 14, 3, 13, 15, 4, 0, 11, 2, 5, 8, 1, 6]);
round(state, m, [12, 13, 9, 11, 15, 10, 14, 8, 7, 2, 5, 3, 0, 1, 6, 4]);
round(state, m, [9, 14, 11, 5, 8, 12, 15, 1, 13, 3, 0, 10, 2, 6, 4, 7]);
round(state, m, [11, 15, 5, 0, 1, 9, 8, 6, 14, 10, 2, 12, 3, 4, 7, 13]);
Using the above-generated code inside compress we get another 1.6x improvement it is not as huge of the boost we had but it’s in the right direction.
Step 3: Inlining round Into Compress
See this commit on GitHub: Inline Round into Compress
Continuing to focus on the previous area we can also see that there is no strong need for round to be its own function if we could just do the same job in compress we could maybe use a for loop even for the 7 rounds we have. And hopefully not having to jump to another function could help us.
To achieve that we first modify g to take the block directly and make it up to g to read from the array of block words.
function g(state: W16, m: W16, x: number, y: number, a, b, c, d) {
  const PERMUTATIONS = [
    0, 1, 2, 3, 4, 5, 6, 7, 8, 9, 10, 11, 12, 13, 14, 15, 2, 6, 3, 10, 7, 0, 4,
    13, 1, 11, 12, 5, 9, 14, 15, 8, 3, 4, 10, 12, 13, 2, 7, 14, 6, 5, 9, 0, 11,
    15, 8, 1, 10, 7, 12, 9, 14, 3, 13, 15, 4, 0, 11, 2, 5, 8, 1, 6, 12, 13, 9,
    11, 15, 10, 14, 8, 7, 2, 5, 3, 0, 1, 6, 4, 9, 14, 11, 5, 8, 12, 15, 1, 13,
    3, 0, 10, 2, 6, 4, 7, 11, 15, 5, 0, 1, 9, 8, 6, 14, 10, 2, 12, 3, 4, 7, 13,
  ];
  const mx = m[PERMUTATIONS[x]];
  const my = m[PERMUTATIONS[y]];
  ...
}
Using this pattern is going to allow us to modify compress’s calls to round into the following pattern:
let p = 0;
for (let i = 0; i < 7; ++i) {
  // Mix the columns.
  g(state, block_words, p++, p++, 0, 4, 8, 12);
  g(state, block_words, p++, p++, 1, 5, 9, 13);
  g(state, block_words, p++, p++, 2, 6, 10, 14);
  g(state, block_words, p++, p++, 3, 7, 11, 15);
  // Mix the diagonals.
  g(state, block_words, p++, p++, 0, 5, 10, 15);
  g(state, block_words, p++, p++, 1, 6, 11, 12);
  g(state, block_words, p++, p++, 2, 7, 8, 13);
  g(state, block_words, p++, p++, 3, 4, 9, 14);
}
This change removes one depth from a call to compress to the deepest function it calls, and surprisingly it is another 1.24x improvement in the performance making it a 1.98x improvement including the previous step. Which means just by inlining the function a little and precomputing the permutations we have almost doubled the performance.

Step 4: Avoid Repeated Reads and Writes From the TypedArray
See this commit on GitHub: Use Variables Instead of an Array For State
A Uint32Array is fast but constantly reading from it and reading from it might not be the best move, especially if we have a lot of writes. A call to g performs 8 writes and 18 reads. Compress has 7 rounds and each round has 8 calls to g making up a total of 448 writes and 1008 reads for each 64 byte of the input. That’s 7W, 16R per input byte on average not considering the internal nodes in the tree. This is a lot of array access.
So what if state was not a Uint32Array and instead we could use 16 SMI variables? The challenge here is that g depends on dynamic access to the state so we would have to hardcode and inline every call to g in order to pull this off.
This is also another code that is easier to generate with meta programming. (That is the process of generating code by writing another code)
const w = console.log;

function right_rot(x, y, r) {
  w(`    s_${x} ^= s_${y};`);
  w(`    s_${x} = (s_${x} >>> ${r}) | (s_${x} << ${32 - r});`);
}

function g_inner(a, b, c, d, d_rot, b_rot) {
  w(`    s_${a} = (((s_${a} + s_${b}) | 0) + m[PERMUTATIONS[p++]]) | 0;`);
  right_rot(d, a, d_rot);
  w(`    s_${c} = (s_${c} + s_${d}) | 0;`);
  right_rot(b, c, b_rot);
}

function g(a, b, c, d) {
  g_inner(a, b, c, d, 16, 12);
  g_inner(a, b, c, d, 8, 7);
}

for (let i = 0; i < 8; ++i) {
  w(`let s_${i} = cv[${i}] | 0;`);
}

w(`let s_8 = 0x6A09E667;`);
w(`let s_9 = 0xBB67AE85;`);
w(`let s_10 = 0x3C6EF372;`);
w(`let s_11 = 0xA54FF53A;`);
w(`let s_12 = counter | 0;`);
w(`let s_13 = (counter / 0x100000000) | 0;`);
w(`let s_14 = blockLen | 0;`);
w(`let s_15 = flags | 0;`);

w(``);

w(`for (let i = 0; i < 7; ++i) {`);
// Mix the columns.
g(0, 4, 8, 12);
g(1, 5, 9, 13);
g(2, 6, 10, 14);
g(3, 7, 11, 15);
// Mix the diagonals.
g(0, 5, 10, 15);
g(1, 6, 11, 12);
g(2, 7, 8, 13);
g(3, 4, 9, 14);
w(`}`);

w(`return new Uint32Array([`);
for (let i = 0; i < 8; ++i) {
  w(`    s_${i} ^ s_${i + 8},`);
}
for (let i = 0; i < 8; ++i) {
  w(`    s_${i + 8} ^ cv[${i}],`);
}
w(`]);`);
Something about meta programming that has always fascinated me is how the generator code does not always have to be beautiful or future proof. It just needs to do its job in the stupidest but simplest possible way.
Running the code above generates a monstrosity that I will not paste or embed in this blog at least not fully, you can check it out on the GitHub repository or look at this snippet and get the general idea.
let s_0 = cv[0] | 0;
...
let s_7 = cv[7] | 0;
let s_8 = 0x6a09e667;
let s_9 = 0xbb67ae85;
let s_10 = 0x3c6ef372;
let s_11 = 0xa54ff53a;
let s_12 = counter | 0;
let s_13 = (counter / 0x100000000) | 0;
let s_14 = blockLen | 0;
let s_15 = flags | 0;
for (let i = 0; i < 7; ++i) {
s_0 = (((s_0 + s_4) | 0) + m[PERMUTATIONS[p++]]) | 0;
s_12 ^= s_0;
s_12 = (s_12 >>> 16) | (s_12 << 16);
s_8 = (s_8 + s_12) | 0;
s_4 ^= s_8;
s_4 = (s_4 >>> 12) | (s_4 << 20);
// ... 90 more line of these
}
return new Uint32Array([
s_0 ^ s_8,
...
s_7 ^ s_15,
s_8 ^ cv[0],
...
s_15 ^ cv[7],
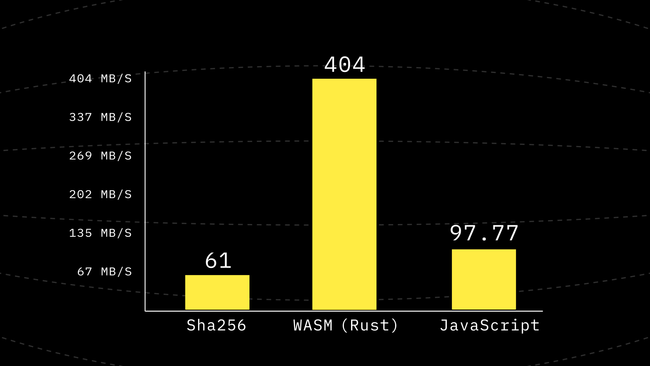
]) as W16;And that’s how we get another 2.2x performance boost. We’re now almost in the same order of magnitude as the WASM implementation 😃
Step 5: Avoid Copies
See this commit on GitHub: Avoid Copies
We have already seen the impact not copying data around into temporary places can have on performance. So in this step, our goal is simple, instead of giving data to compress and getting data back, what if we could use pointers and have an in-place implementation of compress ?
Of course, there are no pointers in JavaScript, but not having to construct new instances of UintNArray is good enough for us. We could always pass an offset along a Uint32Array as a number to determine the starting range, since compress already knows the size of all of the inputs it has to take we would not need a closing range.
With that being said here is the new signature for compress
function compress(
  cv: Uint32Array,
  cvOffset: number,
  blockWords: Uint32Array,
  blockWordsOffset: number,
  out: Uint32Array,
  outOffset: number,
  truncateOutput: boolean,
  counter: number,
  blockLen: Word,
  flags: Word,
) {}
If you pay attention closely you can see that along the new out buffer, we also have added a new boolean flag called truncateOutput. This comes from the observation that in our current use case of the compress function we only ever need 8 words of the output, however, compress is capable of generating 16 words of output that are used in the XMD mode of the hash function that is when we also want larger than the default 256-bit output. However, the current hash function does not provide this functionality but we can still keep the possibility and future prove the function.
But the main part here is that now instead of returning a W8 (which used to be a new Uint32Array every time) we can simply ask the caller about where the output has to be written to. The rest of the diff here is adjusting the read and write offsets and writing to the output buffer directly instead of the return statement. Looking at the final section of compress we can see this:
  if (!truncateOutput) {
    out[outOffset + 8] = s_8 ^ cv[cvOffset + 0];
...
    out[outOffset + 15] = s_15 ^ cv[cvOffset + 7];
  }

  out[outOffset + 0] = s_0 ^ s_8;
...
  out[outOffset + 7] = s_7 ^ s_15;
If you’re wondering why we write output 8..15 first before 0..7, congrats on your attention to detail. And the answer is simple, this leaves the opportunity of correctness even if out == cv. That is a caller to compress can provide the sample place to be used both for cv and tell us to write the final output to the same spot. If we were to reverse the order the assignment to out[outOffset + 0] would overwrite the data before the read from cv[cvOffset + 0] was to happen.
Another huge part of this change is around not using an array for the cvStack since we can benefit from having two items in the stack right next to each other in the same Uint32Array.
To see this point let’s look at the old version of the code and how we were reading from the stack:
let totalChunks = chunkCounter;
while ((totalChunks & 1) === 0) {
  // stack = [A, B]
  const rightChildCv = cvStack.pop()!; // B
  const leftChildCv = cvStack.pop()!; // A
  blockWords.set(leftChildCv, 0); // 0..8 = A
  blockWords.set(rightChildCv, 8); // 8.. = B
  // blockWords = A + B
  cv = first8Words(
    compress(keyWords, blockWords, 0, BLOCK_LEN, flags | PARENT),
  );
  cvStack.push(cv);
  totalChunks >>= 1;
}
Basically, every time we want to merge the top two items of the stack together, we use the compress function with cv = keyWords = IV and blockWords = LEFT + RIGHT. We put the two 8-word cv output from the stack next to each other to form a 16-word input passed as the blockWords parameter.
However, using a Uint8Array for the stack allows us to avoid this data relocation. This is how we define a stack using a Uint32Array:
- const cvStack: W8[] = [];
+ const cvStack = new Uint32Array(maxCvDepth << 3);
+ let cvStackPos = 0;
Now with this new approach pushing to the stack is as simple as writing the 8-word item to the cvStack[cvStackPos..] followed by a cvStackPos += 8, and to pop data from this stack we can just decrement the cvStackPos -= 8 and not care about overwriting the previous item in the stack.
Using the new stack we can rewrite the previous code in the following copy-free way:
let totalChunks = chunkCounter;
while ((totalChunks & 1) === 0) {
  cvStackPos -= 16; // pop 2 items
  compress(
    keyWords,
    0,
    cvStack,     // -> blockWords
    cvStackPos,  // -> blockWordsOffset
    cvStack,     // -> out
    cvStackPos,  // -> outOffset
    true,
    0,
    BLOCK_LEN,
    flags | PARENT,
  );
  cvStackPos += 8; // push 1 item! (the out)
  totalChunks >>= 1;
}
Our other calls to compress are also replaced in the same fashion to avoid most of our data relocations.
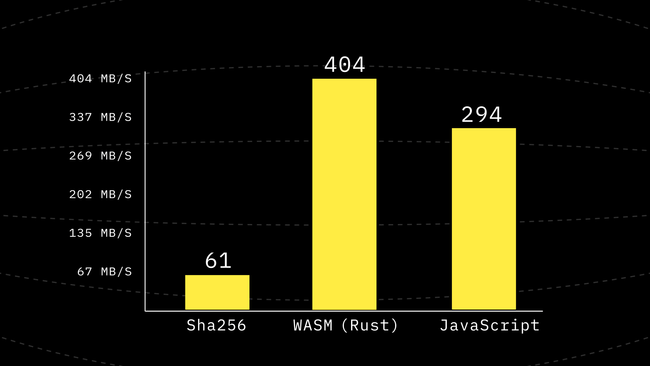
This change gave us a 3x performance improvement and now we are around 3/4th of the speed of WebAssembly! Remember how we started from being ~2000x slower? xD
Step 6: Using Variables for blockWords
See this commit on GitHub: Use Local Variables to Access blockWords in Compress
Similar to step 4, our goal here is to do the same thing we did with state but this time with blockWords.
This means that we have to give up on the PERMUTATIONS table that we so painfully generated and do the permutations by actually swapping the variables because we can not have dynamic access to variables.
First, we need to load the proper bytes into the variables (happening in compress), this part is simple.
  let m_0 = blockWords[blockWordsOffset + 0] | 0;
....
  let m_15 = blockWords[blockWordsOffset + 15] | 0;
Next, we have to replace all of the 15 m[PERMUTATIONS[p++]] we have with m_{i} where i is from 0 to 15 in order of appearance inside the loop
But now we need a hardcoded way to perform a mutate. Let’s look at the following code and study it:
const PERMUTATION = [2, 6, 3, 10, 7, 0, 4, 13, 1, 11, 12, 5, 9, 14, 15, 8];
const COPY = copy(m);
for (let i = 0; i < 16; ++i) m[i] = COPY[PERMUTATION[i]]
Expanding this loop will give us the following but let’s do something interesting and sort it by a simple rule. After a[i] = b[j] we should put a[j] = a[k] and so on. We can start by m[0] = COPY[2] and go from there. If we reach a[z] = b[i] we skip to the first assignment that we still have not seen. To avoid infinite cycles!
|
|
|
At the final stage of this process we replace any COPY[i] with m[i] if there is no previous assignment in previous lines to m[i]. This leaves us with two uses of COPY left. So those are the only things we need to actually copy and keep around before any of the swaps. So we can put all these together and write the following code in place of permute this time using variables.
if (i != 6) {
const t0 = m_0;
const t1 = m_1;
m_0 = m_2;
m_2 = m_3;
m_3 = m_10;
m_10 = m_12;
m_12 = m_9;
m_9 = m_11;
m_11 = m_5;
m_5 = t0;
m_1 = m_6;
m_6 = m_4;
m_4 = m_7;
m_7 = m_13;
m_13 = m_14;
m_14 = m_15;
m_15 = m_8;
m_8 = t1;
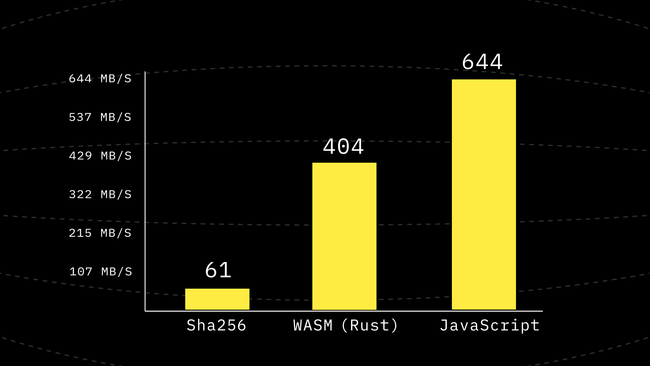
}Running this new version of the code shows another 1.5x improvement reaching performance higher than WebAssembly for the first time so far. But just being a little faster is not a reason to stop.
Step 7: Reuse Internal Buffers
See this commit on GitHub: Reuse Global Uint8Array
This is a simple change, and the idea is once we create a Uint32Array either for blockWords or for cvStack we should keep them around and reuse them as long as they are big enough. We don’t need to make a new one each time.
// Pre-allocate and reuse when possible.
const blockWords = new Uint32Array(16) as W16;
let cvStack: Uint32Array | null = null;

function getCvStack(maxDepth: number) {
  const depth = Math.max(maxDepth, 10);
  const length = depth * 8;
  if (cvStack == null || cvStack.length < length) {
    cvStack = new Uint32Array(length);
  }
  return cvStack;
}

export function hash(input: Uint8Array): Uint8Array {
  const flags = 0;
  const keyWords = IV;
  const out = new Uint32Array(8);

  // The hasher state.
  const maxCvDepth = Math.log2(1 + Math.ceil(input.length / 1024)) + 1;
  const cvStack = getCvStack(maxCvDepth);
  ...
}
The performance change here is not that much visible, it’s only 1.023x which means going from 425MB/s to 435MB/s.
Step 8: Blake3 Is Little Endian Friendly
See this commit on GitHub: Optimize for Little Endien Systems
Blake3 is really Little Endian friendly and since most user-facing systems are indeed Little Endian, this is really good news and we can take advantage of it.
Right now even if we are running on a Little Endian machine, we still call readLittleEndianFull in order to read the input data into blockWords first before calling compress, however if we’re already on a Little Endian machine read is useless and we could allow compress to read directly from the input buffer without any intermediary temporary relocation.
First, we define the global constant that will be true on big-endian systems, then we create a new Uint32Array view backed by the same buffer as the input. Note that this does not copy the actual buffer and only gives us a u32 view over the same data.
const IsBigEndian = !new Uint8Array(new Uint32Array([1]).buffer)[0];
...
export function hash(input: Uint8Array): Uint8Array {
const inputWords = new Uint32Array(
input.buffer,
input.byteOffset,
input.byteLength >> 2,
);
...
for (let i = 0; i < 16; ++i, offset += 64) {
if (IsBigEndian) {
readLittleEndianWordsFull(input, offset, blockWords);
}
compress(
cvStack,
cvStackPos,
IsBigEndian ? blockWords : inputWords,
IsBigEndian ? 0 : offset / 4,
cvStack,
cvStackPos,
true,
chunkCounter,
BLOCK_LEN,
flags | (i === 0 ? CHUNK_START : i === 15 ? CHUNK_END : 0),
);
}
...
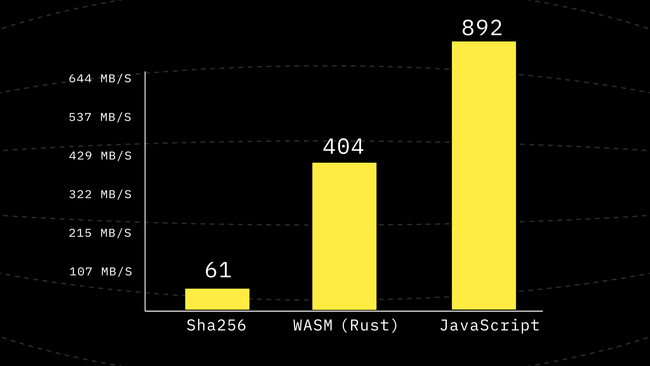
}With this change, we get yet again another 1.48x performance improvement! And now things look even better for JavaScript than WASM by some reasonable margin. Now we are 1.6 times faster than WebAssembly in pure JavaScript.
Giving WASM SIMD a Chance
Earlier in this blog I promised that we will not be shipping a WASM file. Of course in theory you can just encode the file in base64 and include it as text in JS. But who on earth would find that ok?
Since we already explored meta-programming and saw how small the generator code is, we can try to reuse the same ideas to generate the wasm file on load. This is of course something that is going to require us to understand the WASM binary format at a good enough level to write a WASM file by hand.
So let’s get ourselves familiar with the WebAssembly binary format.
WASM Binary Format
For anyone interested enough here is a link to the official spec. But you don’t need to go too deep to keep up with this article.
A WASM module consists of a header and then a few (optional) sections, the header is only the magic bytes and the version of the module. These are hardcoded values. Then we have the following sections that we care about:
-
SECTION 1: Types
This section contains type definitions of the different functions in the module. For each function, we define it by the argument types to return types.
-
SECTION 2: Imports
Here the WASM is given the chance to tell the host what are the things that need to be imported from the host. For example, in our case, we require the host to give us the memory to use.
-
SECTION 3: Functions
Here we include a list of the functions we are going to have by using the type alias to a type that was defined in Section 1.
-
SECTION 7: Exports
Here WASM can tell the host which one of the functions it has defined is exported and we will also have to assign a “name” to each exported item.
-
SECTION 10: Code
And here comes the definition of a function, this includes declaring local variables followed by the instructions. Every function ends with
0x0b
const wasmCode = [
  0x00, 0x61, 0x73, 0x6d, // magic
  0x01, 0x00, 0x00, 0x00, // version

  // SECTION 1: Types
  // vec<functype>
  0x01, 0x04, // {
  0x01, // [

  // T0: func compress4x() -> ()
  0x60, 0x00, 0x00, // ]}

  // SECTION 2: Imports
  0x02, 0x0b, // {
  0x01, // [(
  0x02, 0x6a, 0x73, // mod="js"
  0x03, 0x6d, 0x65, 0x6d, // nm="mem"
  0x02, 0x00, 0x01, // mem {min=1, max=empty}
  //)]}

  // SECTION 3: Functions
  // vec<typeidx>
  0x03, 0x02, // {
  0x01, // [
  // T0
  0x00, // ]}

  // SECTION 7: Exports
  0x07, 0x0e, // {
  0x01, // [(
  // name="compress4x"
  0x0a, 0x63, 0x6F, 0x6D, 0x70, 0x72, 0x65, 0x73, 0x73, 0x34, 0x78,
  // export desc: funcidx
  0x00, 0x00,//)]}

  // SECTION 10: Code
  // Reserve 5 bytes for a u32:LEB128 to
  // be filled later.
  // codesec = section(vec(code))
  // code = size:u32 code:func
  // func = vec(locals) e:expr
  // locals = n:u32 t:valtype
  // expr = (in:instr)* 0x0b
  0x0a, 0x00, 0x00, 0x00, 0x00, 0x00, // {
  0x01, // [(
  // size:u32; to be filled later
  0x00, 0x00, 0x00, 0x00, 0x00,
  // begin func:
  0x01, // [
  0x20, 0x7b, // 32xv128
  // ]

  // -- Instructions go here.

  0x0b,
  // )]}
];
Here you can see the basic skeleton of the wasm module that we are interested in generating. If you notice we’re interested in making a function called compress4x which we intend to use as a main function that performs 4 compress calls in parallel using SIMD.
Why no parameters? For simplicity at least initially we want the compress4x function to operate on fixed addresses of the memory.
What is SIMD?
If you’re not familiar with SIMD don’t worry, it is basically a simple vectorized type. The acronym stands for Single Instruction Multiple Data. WASM supports v128 which means a vector consisting of 128-bit. And provides instructions that can view this data in different ways, an example of such a view on the data is i32x4 which means that we want to use the data as if it were 4 i32 values next to each other. Or you could also view the data as i8x16 . Notice how in both of these examples the total size of the data stays the same 128=32x4=8x16.
So as a simple example imagine we wanted to add 4 i32 values with another four. For that, we would use the i32x4.add instruction this would handle the carry bits and overflowing as if each of the numbers are of type i32 so it is not the same as one big-num (i128) being added to another.
But for some bit-wise operations such as or, xor we do not care about the layout of the vector in these cases we use the same operation anyway and write things like v128.or , v128.xor.
Memory Layout
A simple call to our normal compress function can work with 16 words of state if it were to reuse the state as the output as well. We basically need m[0]...m[15], s[0]...s[15] . So trivially compress4x would need 4 times as much to work properly.
function compress4x(Sa, Sb, Sc, Sd) {
  let s0 = [Sa[0], Sb[0], Sc[0], Sd[0]]; // i32x4
  ...
  let s15 = [Sa[15], Sb[15], S[15], Sd[15]];
  ...
}
The pseudo-code above tries to tell the story of how we are planning to rearrange the 4 inputs bytes into different vectors where each s[i] contains the IN_{0, 1, 2, 3}[i] values.
The easiest WASM instruction to load a part of memory as one v128 is perhaps i128.load. So let’s just assume that the input data is transposed the way it should have been and is already ready and sitting in the memory.
In the binary format variables are not named, we have to refer to them by their index. For example, earlier we used 0x20, 0x7b, // 32xv128 to declare 32 variables of type v128 and given that we do not have any parameters this means that these will be variables from $0...$31. In this, I will be using the $N notation to refer to variable N and from earlier implementations of our compress function we know that we need 16 variables for blockWords and 16 more for state.
So let’s just decide to use $0..$15 as blockWords variables and the rest that is $16..$31 as state variables. And our memory layout is very simple we assume that these variables are in memory in the same exact order. This will save us some headaches and allow us to simplify loading each variable.
for (let i = 0; i < 32; ++i) {
  put([
    0x41, ...toLebU32(i * 16), // i32.const [16 * i]
    0xfd, 0, 4, 0,             // i128.load align=4
    0x21, i,                   // local.set $[i]
  ]);
}
Each i128 consumes 16 bytes so that means we know that variable $i is expected to live at address $i\times16$.
So let’s break this code down. First, we have the put function, think about it as our way to extend the previously defined wasmCode array by extending some more bytes into it. The other function is toLebU32 which takes a number and turns it into the the Little Endian Base variable-length code formatting that the WASM binary requires numbers to be in.
The rest is a series of instructions that do some task. We are going to cover them really soon.
Some WebAssembly Instructions
WebAssembly is a stack-based virtual machine, what this means is that some operations push stuff to the stack and the next instructions take their parameters by popping values from the stack.
Here is a table of the instructions that we will be using in this blog and their explanation:
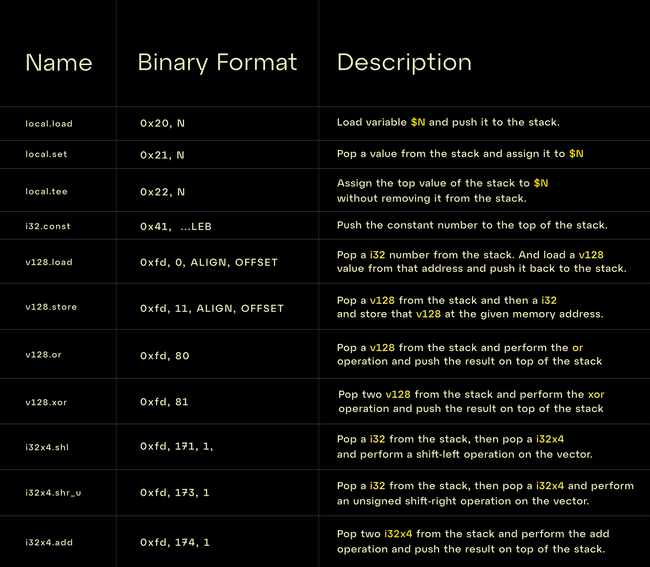
And using only these 11 instructions we can implement the compress4x function.
Generating the Code
Since we placed blockWords in $0..$15 we can simply use the same permutation tables that we had already computed in previous steps as the variable indices. Then anywhere that we had a code similar to state[i] we basically needed to access $[16 + i]. However, we can do this addition initially where we call g().
So if you remember we had a code similar to the left side before but we can simply add 16 to all of these state indices here and anywhere else we could use the index as the actual variable index. Which is kind of cool.
|
|
For the next step we need to implement g and if you remember we could also write g by two calls to an internal method, here we can call it gi.
function g(a: number, b: number, c: number, d: number) {
  gi(a, b, c, d, 16, 12);
  gi(a, b, c, d, 8, 7);
}

function gi(
  a: number, b: number,
  c: number, d: number,
  d_rot: number, b_rot: number
) {
  let m = M_ACCESS_ORDER[_next_m++];
  // s[a] = (((s[a] + s[b]) | 0) + m[m]) | 0;
  // s[d] ^= s[a];
  // s[d] = (s[d] >>> d_rot) | (s[d] << (32 - d_rot);
  // s[c] = (s[c] + s[d]) | 0;
  // s[b] ^= s[c];
  // s[b] = (s[b] >>> b_rot) | (s[b] << (32 - b_rot);
}
Converting the above series of operations is a pretty simple task, we start off by trying to evaluate every expression from the inside out and replace every access either to s[i] or m[i] simply with local.get i since we have already normalized the indices.
put([
  0x20, b,          // local.load $[b]
  0x20, a,          // local.load $[a]
  0x20, m,          // local.load $[m]
  0xfd, 174, 1,     // i32x4.add
  0xfd, 174, 1,     // i32x4.add
  0x22, a,          // local.tee $[a]
  0x20, d,          // local.get $[d]
  0xfd, 81,         // v128.xor
  0x22, d,          // local.tee $[d]
  0x41, d_rot,      // i32.const [d_rot]
  0xfd, 173, 1,     // i32x4.shr_u
  0x20, d,          // local.get $[d]
  0x41, 32 - d_rot, // i32.const [32 - d_rot]
  0xfd, 171, 1,     // i32x4.shl
  0xfd, 80,         // i32x4.or
  0x22, d,          // local.tee $[d]
  0x20, c,          // local.load $[c]
  0xfd, 174, 1,     // i32x4.add
  0x22, c,          // local.tee $[c]
  0x20, b,          // local.load $[b]
  0xfd, 81,         // v128.xor
  0x22, b,          // local.tee $[b]
  0x41, b_rot,      // i32.const [b_rot]
  0xfd, 173, 1,     // i32x4.shr_u
  0x20, b,          // local.get $[b]
  0x41, 32 - b_rot, // i32.const [32 - b_rot]
  0xfd, 171, 1,     // i32x4.shl
  0xfd, 80,         // i32x4.or
  0x21, b,          // local.set $[b]
]);
However looking at the above statements, there is something interesting that’s happening at the beginning of gi we are loading $b and at the end, we store $b. Since we always call gi twice right after each other this means we will have the following code being generated in the middle:
  0x21, b,          // local.set $[b]
  0x20, b,          // local.load $[b]
Which could be replaced by a single tee operation. So we could basically take the first and last instructions out of gi and move them to g this will give us to inject the tee operation in the middle of the calls to gi.
function g(a: number, b: number, c: number, d: number) {
  put([0x20, b]); // local.load $[b]
  gi(a, b, c, d, 16, 12);
  put([0x22, b]); // local.tee $[b]
  gi(a, b, c, d, 8, 7);
  put([0x21, b]); // local.set $[b]
}
Step 9: Simple use of compress4x
Supposing we have compress4x calling it in hash can be implemented in a naive way which is done on this commit. However, since it’s a big large I can not go through a lot of it here. Right now we take as many 4KB chunks of data as we can (except for the last block) and pass them to compress4x however we’re not using compress4x for any of the stack merge steps. Which is one of the future improvements that we could make. Also since WASM is always little-endian we make sure the bytes are also little-endian before writing them to the WASM memory.
We can see a 1.39x improvement from the last benchmark, at this point, we’re 2.21x faster than the WebAssembly implementation we had. And the good news is our WASM never asks for more memory pages. It only ever needs 1 page regardless of the input size. Which in itself is a huge win for us.
Future Work
Blake3 is an awesome hash function. One that has unlimited potential for parallelization and optimizations. In this blog we focused on the performance of V8, so expect a detailed benchmark on different browsers and engines at some point from us.
Another path that was explored but did not make it to the blog is asm.js, all I have to say about asm.js is that V8 is already so good at static analysis that asm.js did not make much of a difference. However, it did improve the performance of the pure JS compress function on Firefox when I tested it a few months back.
And of course, an important task is packaging all of this in a nice and easy-to-use module. So stay tuned for the release! In the meantime, if you’re using Deno, you know how to import a file from GitHub. So don’t be shy and go ahead and start this blog’s repo.
Why Is This Important?
Due to the trustless nature of Fleek Network, new interesting infrastructure can be built, like this JavaScript implementation of Blake3. Of course, we still have to do some additional verification— we want to leverage Blake3 to build some of the most performant content addressable streaming functionalities that can be used for many different use cases. Given that verification happens on the client side, making sure its performance implications are negligible is of the utmost importance to us.
If you’re interested in this blog and want to learn more about what we’re building with Fleek Network, please make sure to stay in touch and check out our resources. And if you are a developer who likes to work on these sorts of things, please contact us. We’d love to talk!